Build an Electron app
Hands-on tutorial on using QVAC SDK with Electron.
What we'll build
We'll build an LLM chat desktop application using the following stack:
- Electron as the desktop runtime;
- React for the user interface;
- Tailwind CSS for styling; and
- QVAC to run LLM inference locally.
By the end of this tutorial, we'll have built the following:
Prerequisites
- Node.js v22.17
- npm v10.9
- Linux/macOS (Windows with small adjustments)
On Windows
Some commands are Bash‑specific. On Windows, use PowerShell/WSL or adapt them.
Step 1: set up an Electron project
First, let's create a minimal Electron app structure: a main process that opens a window and a simple renderer page.
Create a new project:
# run on terminal
mkdir llm-desktop-app
cd llm-desktop-app
npm init -y
Install Electron:
npm i -D electronInstall TypeScript tooling for the main process:
npm i -D typescript @types/nodeCreate main.ts:
const { app, BrowserWindow } = require('electron')

const createWindow = () => {
  const win = new BrowserWindow({
    width: 800,
    height: 600
  })

  win.loadFile('index.html')
}

app.whenReady().then(() => {
  createWindow()
})
main.ts is the Electron main process entry point. It bootstraps the app and creates the desktop window, so everything else (renderer/UI) depends on it.
Create tsconfig.json for the main process:
{
  "compilerOptions": {
    "target": "ES2022",
    "module": "CommonJS",
    "strict": false,
    "esModuleInterop": true,
    "skipLibCheck": true
  },
  "include": ["main.ts", "preload.ts"]
}
This emits main.js and preload.js next to their .ts sources so Electron can run them.
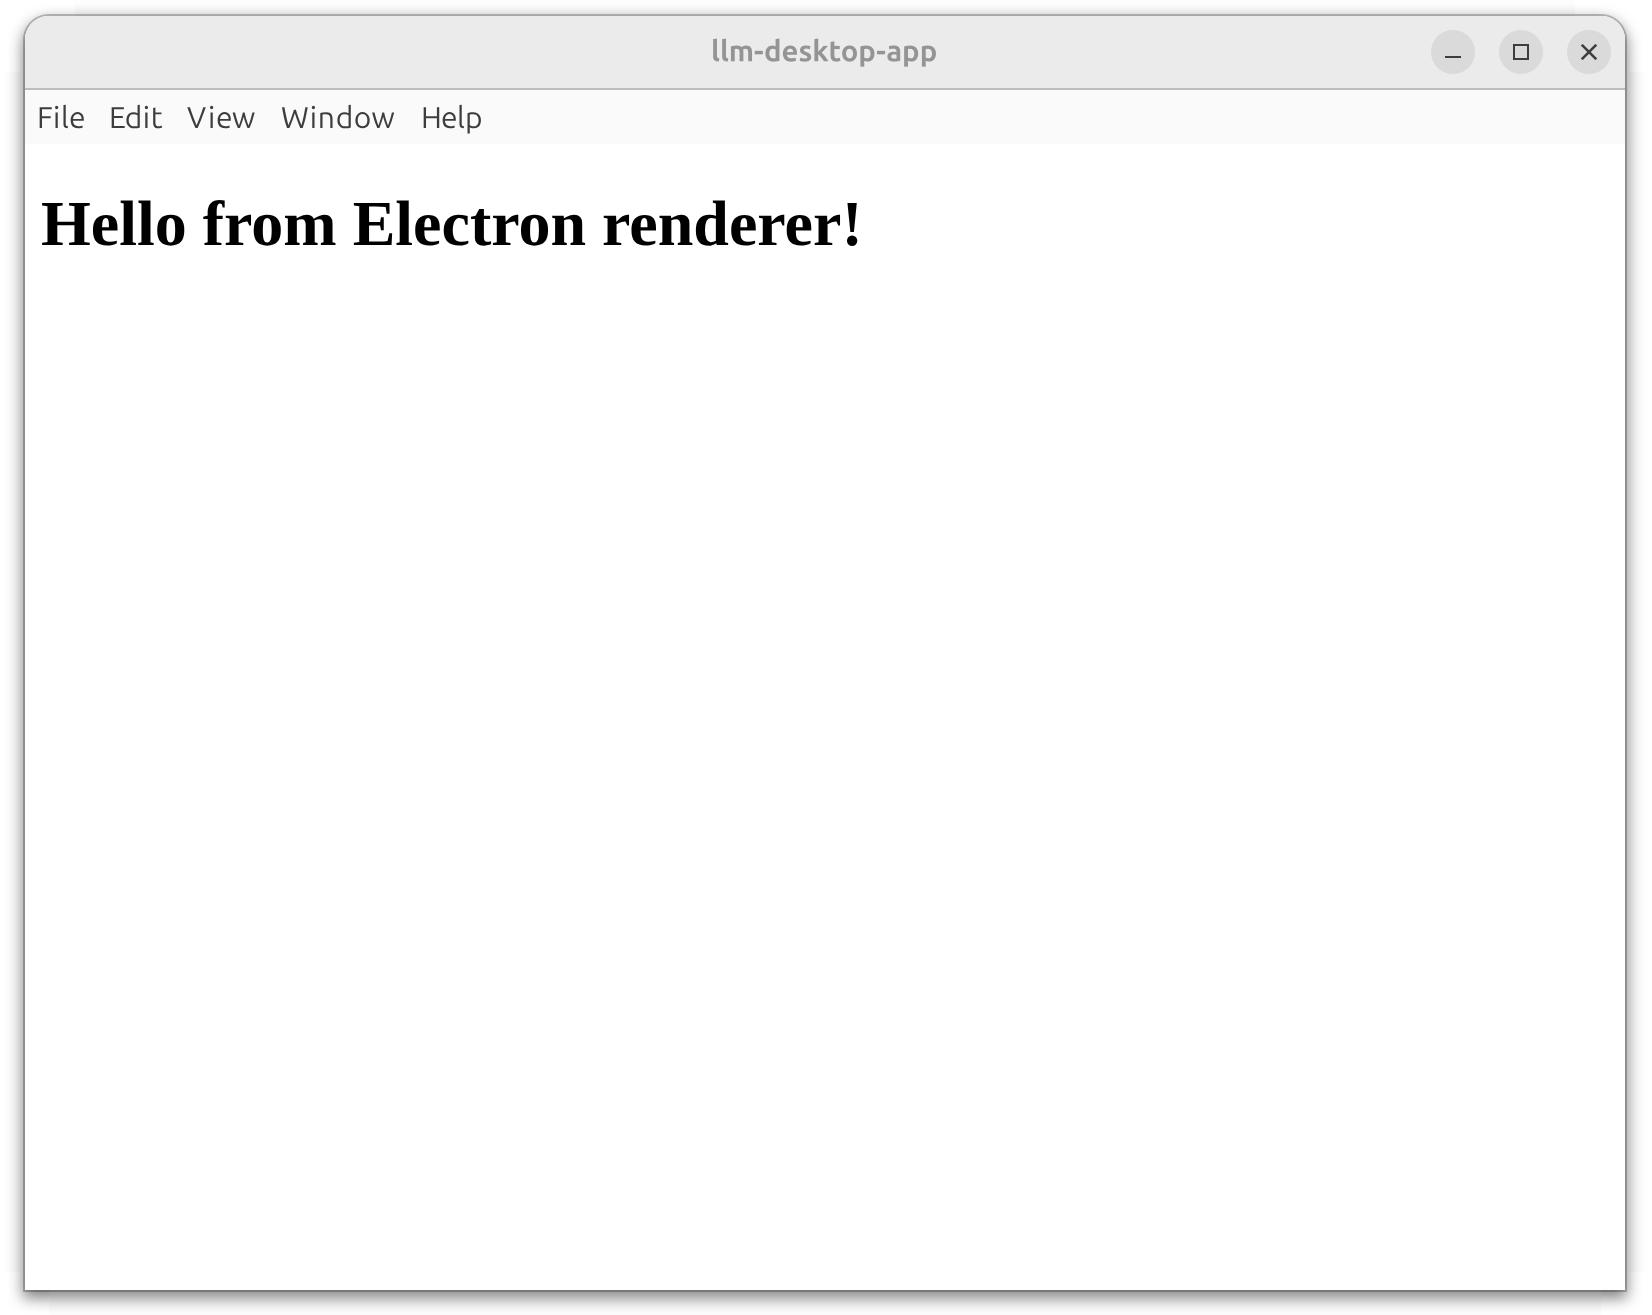
Create index.html:
<!DOCTYPE html>
<html>
  <body>
    <h1>Hello from Electron renderer!</h1>
  </body>
</html>
index.html is a minimal renderer page used only to confirm Electron can load and display content. We’ll replace it later when the React/Vite renderer takes over.
Set the entry point and scripts in package.json:
npm pkg set main="main.js"
npm pkg set scripts.build:main="tsc -p tsconfig.json"
npm pkg set scripts.start="npm run build:main && electron . --no-sandbox"
Start the application:
npm startConfirm that an Electron window opens and renders the "Hello from Electron renderer!" page:
Step 2: add a React frontend
In this step, we'll scaffold a React renderer with Vite, install its dependencies, and have Electron load it from the Vite dev server.
Create a React renderer using Vite (TypeScript template):
npm create vite@latest renderer -- --template react-tsWhen prompted, answer No to both questions.
Install the renderer dependencies:
cd renderer
npm i
cd ..
This installs the packages scaffolded by Vite (React, Vite, and related tooling).
Modify main.ts to load the Vite dev server URL from Electron:
const { app, BrowserWindow } = require('electron')

const createWindow = () => {
  const win = new BrowserWindow({
    width: 800,
    height: 600
  })

  win.loadFile('index.html')
  win.loadURL('http://localhost:5173')
}

app.whenReady().then(() => {
  createWindow()
})
This switches the window from the static index.html to the Vite dev server, so the React UI loads and can hot‑reload during development.
Step 3: enable hot reload
In this step, we’ll enable fast feedback: Vite HMR for the React renderer, and electronmon to restart Electron when main/preload files change. You should run the following commands from the project root and update the root package.json.
Install dev dependencies:
npm i -D electronmon concurrently wait-onAdd the following scripts to package.json:
npm pkg set scripts.dev="concurrently \"npm run dev:renderer\" \"npm run dev:main\" \"npm run dev:electron\""
npm pkg set scripts.dev:renderer="cd renderer && npm run dev"
npm pkg set scripts.dev:main="tsc -w -p tsconfig.json"
npm pkg set scripts.dev:electron="wait-on http://localhost:5173 main.js && electronmon . --no-sandbox"
These scripts run the Vite dev server, keep the Electron main/preload TypeScript compiled, and start Electron only after Vite and main.ts are ready.
Add the following property to package.json:
npm pkg set 'electronmon.pattern[0]=!renderer' 'electronmon.pattern[1]=!renderer/**/*'This prevents Electron from restarting on renderer changes, since Vite already handles UI hot reload.
Start the combined dev workflow (Vite + Electron):
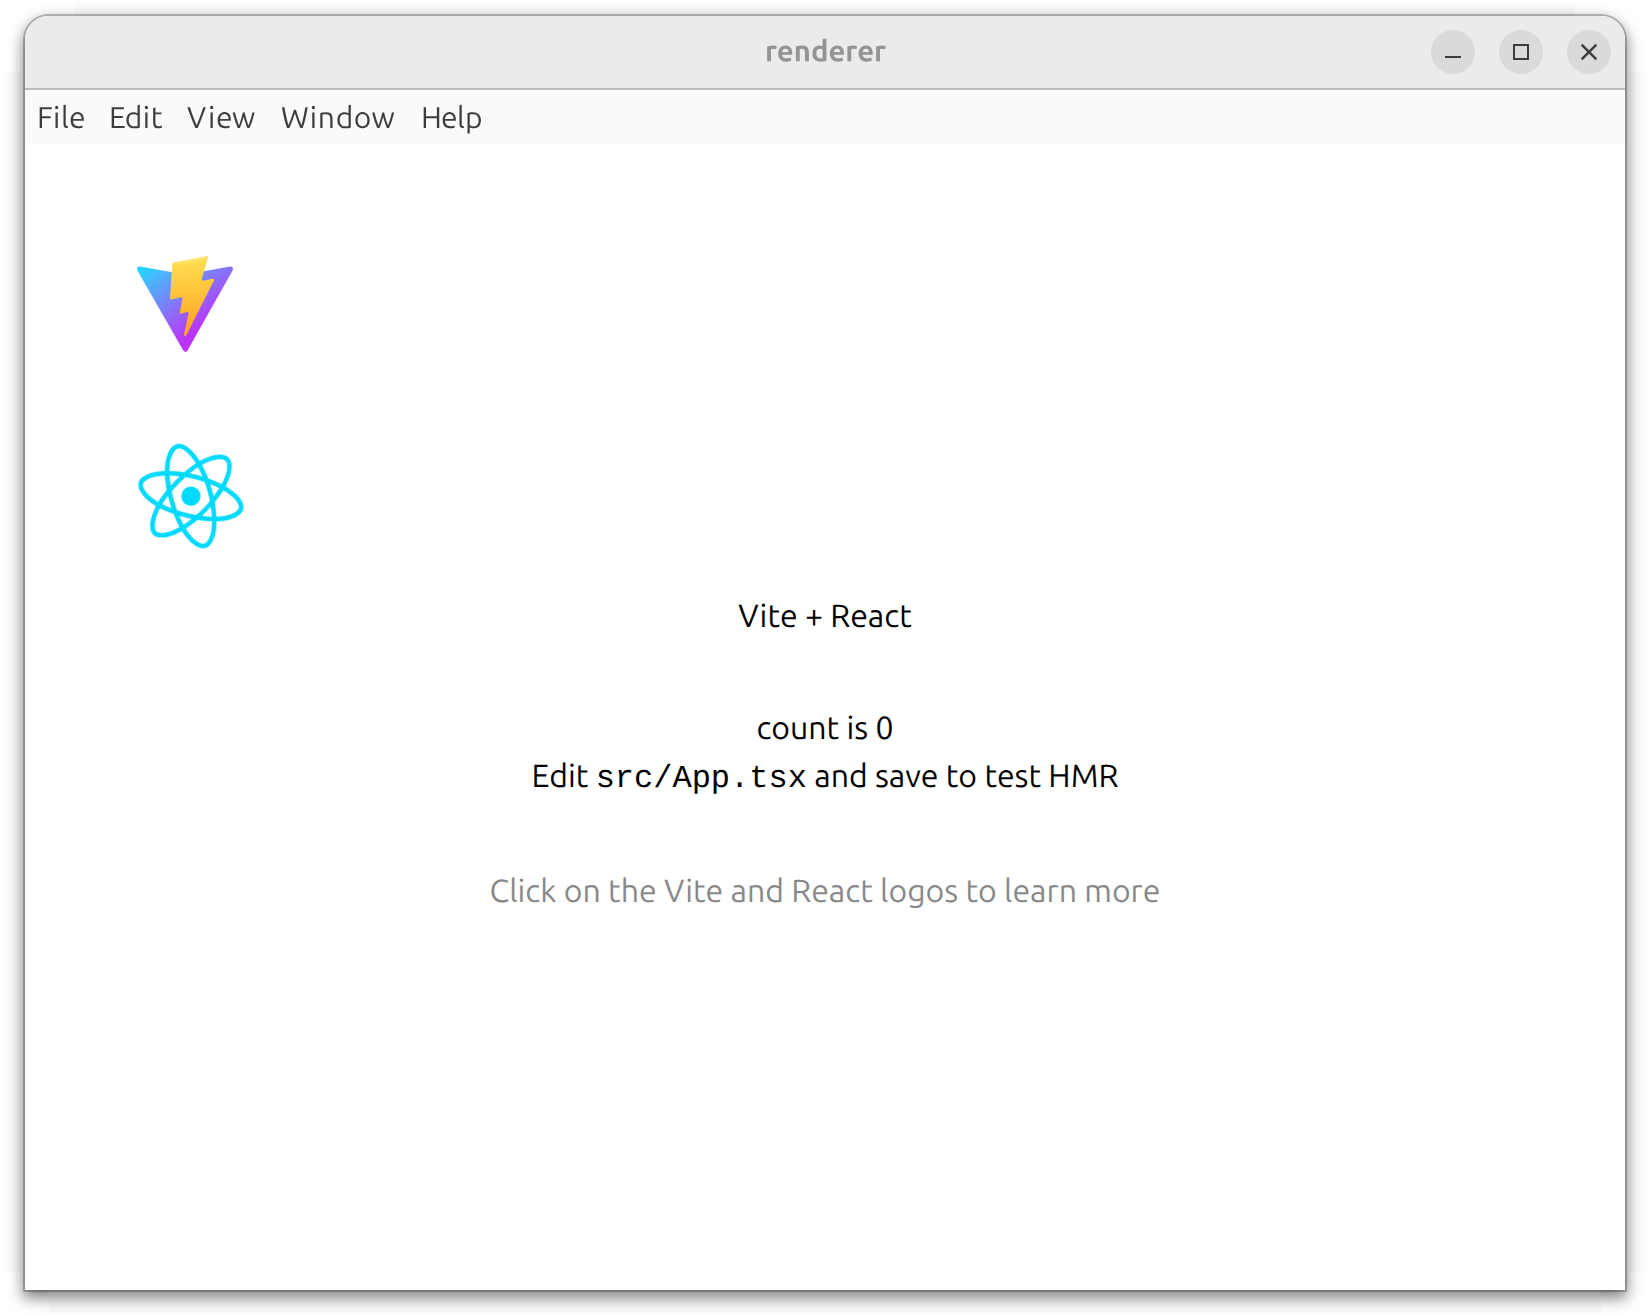
npm run devConfirm that an Electron window loads the Vite renderer, and that changes under renderer/ hot‑reload without restarting Electron:

Step 4: add Tailwind CSS
In this step, we add Tailwind CSS to the React renderer and enable the Vite plugin so utility classes are processed.
Install Tailwind CSS in the React renderer:
# in project root
cd renderer
npm i tailwindcss @tailwindcss/vite clsx
cd ..
Update renderer/vite.config.ts to enable the Tailwind Vite plugin:
import { defineConfig } from 'vite'
import react from '@vitejs/plugin-react'
import tailwindcss from '@tailwindcss/vite'

// https://vite.dev/config/
export default defineConfig({
  plugins: [react()],
  plugins: [react(), tailwindcss()],
})
This tells Vite to process Tailwind classes at build time, so utility styles are available in the renderer.
Replace the entire contents of renderer/src/index.css with the following code:
@import 'tailwindcss';This replaces the default Vite styles with Tailwind’s base layer, so utility classes apply consistently.
If you have npm run dev running, restart it so the Vite config changes take effect:
Step 5: create the chat UI
In this step, we’ll replace the default Vite scaffold with a minimal chat UI (no inference yet).
Remove the StrictMode wrapper in renderer/src/main.tsx:
import { StrictMode } from 'react'
import { createRoot } from 'react-dom/client'
import './index.css'
import App from './App'

createRoot(document.getElementById('root')).render(<StrictMode> <App /> </StrictMode>,)
createRoot(document.getElementById('root')).render(<App />)
This keeps the same entry point but removes React Strict Mode, which avoids double-invoked effects in development.
Replace the entire contents of renderer/src/App.tsx with the following code:
import { useState } from 'react'
import clsx from 'clsx'
function App() {
const [loading, setLoading] = useState(false)
const [msgHistory, setMsgHistory] = useState([])
const [inputText, setInputText] = useState('')
// Append a user message and a stub assistant response.
const handleSend = () => {
const newMsgHistory = [
...msgHistory,
{ role: 'user', content: inputText },
{ role: 'assistant', content: 'Response from the assistant' }
]
setInputText('')
setMsgHistory(newMsgHistory)
}
return (
<div className="h-screen w-[100vw] text-white bg-gray-900 p-4 flex flex-col gap-4">
{/* Main output area */}
<div className="flex-1 rounded-lg border-2 border-teal-500 p-4 flex flex-col gap-4 overflow-y-auto">
{loading ? (
<div className="min-h-0 flex-1 flex items-center justify-center text-2xl">
Loading...
</div>
) : (
msgHistory.map((msg, index) => (
<div
key={index}
className={clsx(
'flex',
msg.role === 'user' ? 'justify-end' : 'justify-start'
)}
>
{/* Message bubble */}
<div className="p-2 rounded-lg bg-gray-600 prose max-w-3/4">
{msg.content}
</div>
</div>
))
)}
</div>
{/* Input area */}
<div className="h-[108px] rounded-lg border-2 border-teal-500 flex p-4 gap-4">
<textarea
className="flex-1 resize-none bg-transparent outline-none"
placeholder="Type your message here..."
value={inputText}
onChange={e => setInputText(e.target.value)}
onKeyDown={e => {
if (e.key === 'Enter' && !e.shiftKey) {
e.preventDefault()
handleSend()
}
}}
/>
<button
onClick={handleSend}
className=" text-teal-500 outline-none underline underline-offset-4"
>
Send
</button>
</div>
</div>
)
}
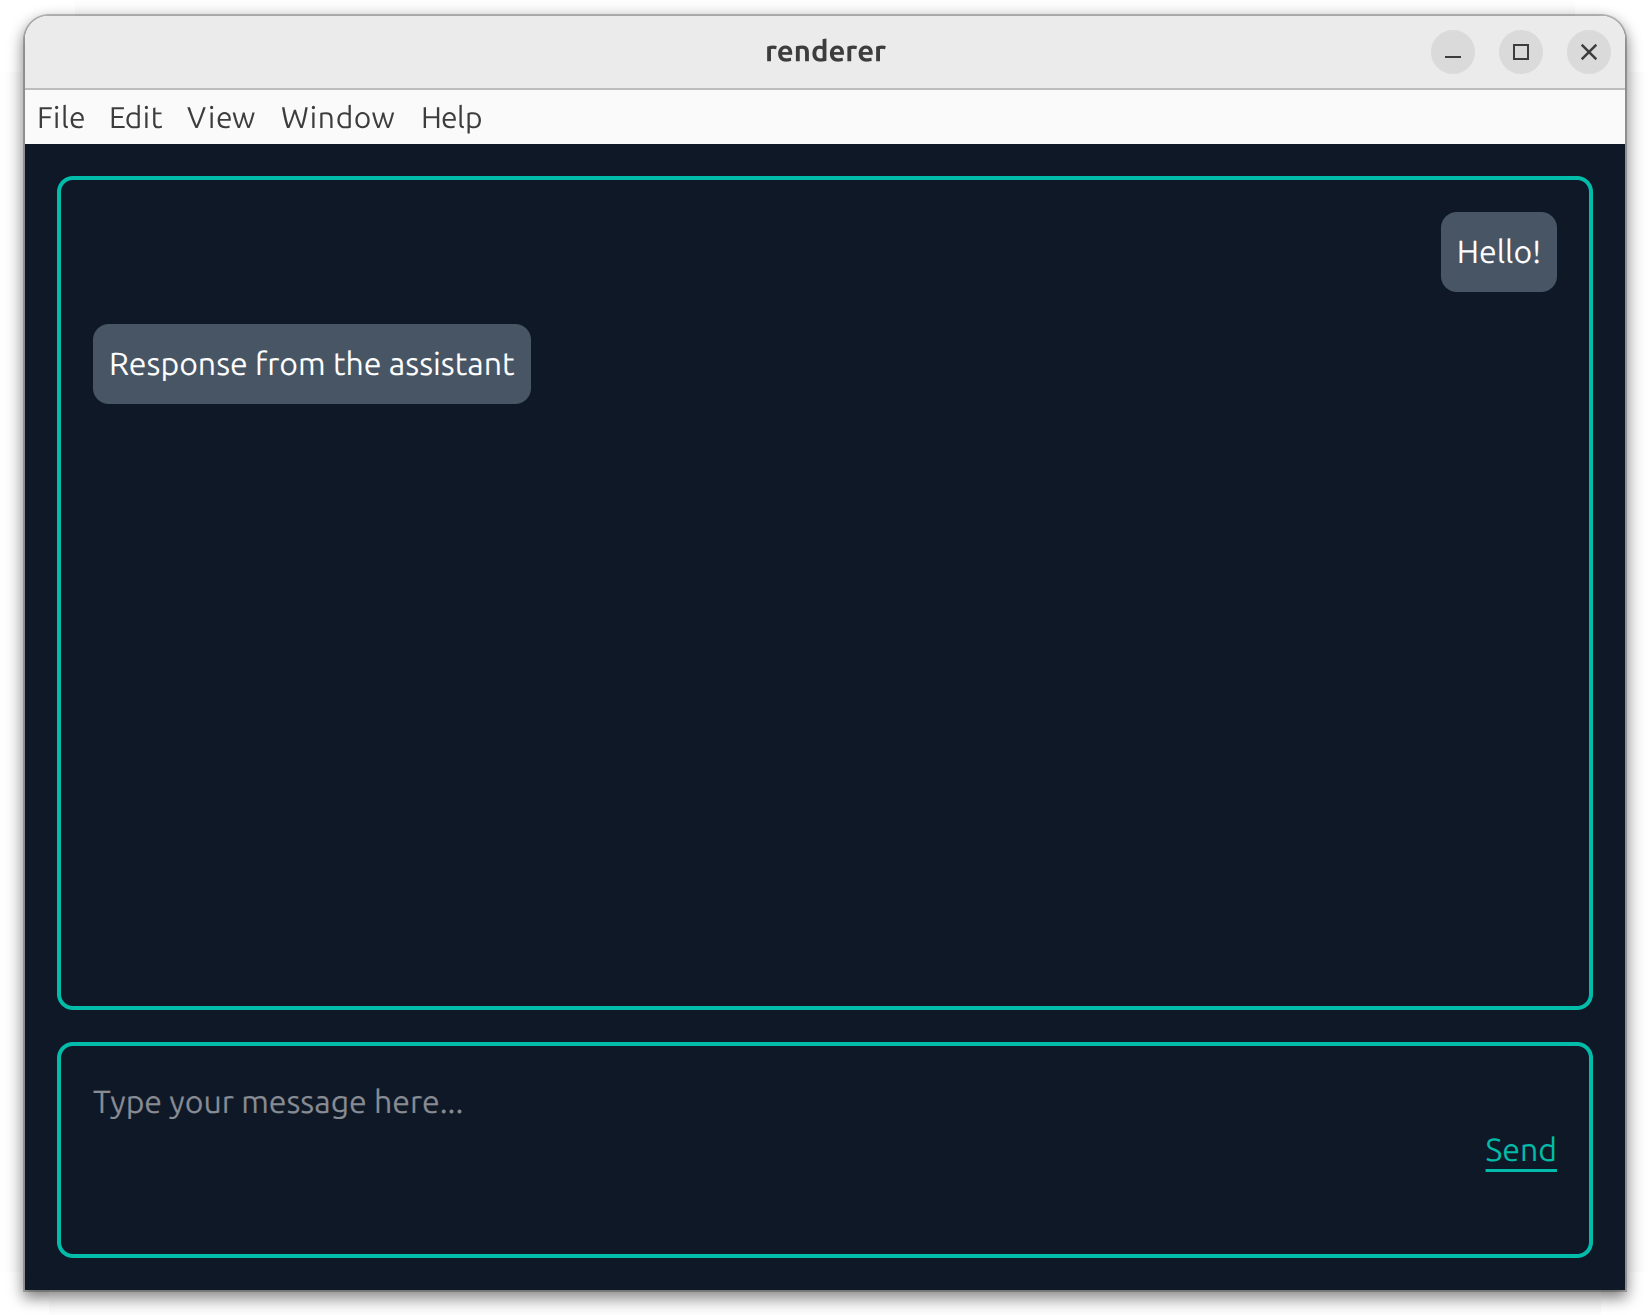
export default AppWe replaced the default Vite App.tsx content. Before, it was the starter counter UI from the Vite template. Now it is a minimal chat UI that collects input and renders message history (with a stub assistant response).
Confirm that you see a simple chat UI, and that clicking Send appends a user message and a stub assistant response:
Step 6: add QVAC
Finally, in this step we’ll add QVAC by wiring the Electron main process to the SDK, exposing a safe preload API, and streaming completions into the chat UI. Except for substep 4, all actions in this step should be done from the project root.
Install QVAC SDK:
npm i @qvac/sdkCreate preload.ts to expose a small, safe API from the main process to the renderer:
const { contextBridge, ipcRenderer } = require('electron')

// Expose a narrow, safe API to the renderer via IPC.
contextBridge.exposeInMainWorld('qvacSDK', {
  loadModel: () => ipcRenderer.invoke('load-model'),
  infer: history => ipcRenderer.invoke('infer', history),
  onCompletionStream: cb =>
    ipcRenderer.on('completion-stream', (event, token) => cb(token)),
  unloadModel: () => ipcRenderer.invoke('unload-model')
})
This bridges the renderer to the main process without enabling full Node access, which keeps the app safer while still allowing QVAC calls.
Replace the entire contents of main.ts with the following code:
const { app, BrowserWindow, ipcMain } = require('electron')
const path = require('path')
const {
  LLAMA_3_2_1B_INST_Q4_0,
  loadModel,
  unloadModel,
  completion
} = require('@qvac/sdk')

let win
let modelId

// Create the Electron window and load the renderer.
const createWindow = () => {
  win = new BrowserWindow({
    width: 800,
    height: 600,
    webPreferences: {
      preload: path.join(__dirname, 'preload.js'),
      contextIsolation: true,
      nodeIntegration: false
    }
  })

  win.loadURL('http://localhost:5173')
}

// IPC handlers: load model, run completion, unload model.
const setupHandlers = () => {
  ipcMain.handle('load-model', async () => {
    modelId = await loadModel({
      modelSrc: LLAMA_3_2_1B_INST_Q4_0,
      modelType: 'llm',
      onProgress: progress => {
        console.log(progress)
      }
    })
    return 'model loaded'
  })

  ipcMain.handle('infer', async (event, history) => {
    if (!modelId) {
      throw new Error('Model not loaded. This should not happen.')
    }

    const result = completion({ modelId, history, stream: true })
    // Stream tokens back to the renderer.
    for await (const token of result.tokenStream) {
      win.webContents.send('completion-stream', token)
    }
    // Signal completion to the renderer.
    win.webContents.send('completion-stream', '')
  })

  ipcMain.handle('unload-model', async () => {
    if (!modelId) {
      throw new Error('Model not loaded. This should not happen.')
    }

    await unloadModel({ modelId })
    modelId = null
    return 'model unloaded'
  })
}

app.whenReady().then(() => {
  createWindow()
  setupHandlers()
})
Before, main.ts only created a window and loaded the Vite dev server. Now we add IPC handlers to load a model, run completion() with streaming, and unload the model. After this change, the main process becomes the bridge between the renderer UI and QVAC.
Replace the entire contents of renderer/src/App.tsx with the following code:
import { useEffect, useState } from 'react'
import clsx from 'clsx'

const { loadModel, infer, onCompletionStream, unloadModel } = window.qvacSDK

function App() {
  const [loading, setLoading] = useState(true)
  const [processing, setProcessing] = useState(false)
  const [msgHistory, setMsgHistory] = useState([])
  const [inputText, setInputText] = useState('')

  // Load the model once and subscribe to streaming tokens.
  useEffect(() => {
    loadModel().then(() => setLoading(false))

    onCompletionStream(token => {
      console.log(token)
      if (token === '') {
        setProcessing(false)
      } else {
        setMsgHistory(prev => {
          const newMsgHistory = [...prev]
          newMsgHistory[newMsgHistory.length - 1].content += token
          return newMsgHistory
        })
      }
    })

    return () => unloadModel()
  }, [])

  // Send the latest user message and start streaming the response.
  const handleSend = () => {
    const nextHistory = [
      ...msgHistory,
      { role: 'user', content: inputText }
    ]
    setMsgHistory([...nextHistory, { role: 'assistant', content: '' }])
    infer([
      { role: 'system', content: 'You are a helpful assistant.' },
      ...nextHistory
    ])
    setInputText('')
    setProcessing(true)
  }

  return (
    <div className="h-screen w-[100vw] text-white bg-gray-900 p-4 flex flex-col gap-4">
      {/* Output area */}
      <div className="flex-1 rounded-lg border-2 border-teal-500 p-4 flex flex-col gap-4 overflow-y-auto">
        {loading ? (
          <div className="min-h-0 flex-1 flex items-center justify-center text-2xl">
            Loading...
          </div>
        ) : (
          msgHistory.map((msg, index) => (
            <div
              key={index}
              className={clsx(
                'flex',
                msg.role === 'user' ? 'justify-end' : 'justify-start'
              )}
            >
              {/* Message bubble */}
              <div className="p-2 rounded-lg bg-gray-600 prose max-w-3/4">
                {msg.content}
              </div>
            </div>
          ))
        )}
      </div>

      {/* Input area */}
      <div className="h-[108px] rounded-lg border-2 border-teal-500 flex p-4 gap-4">
        <textarea
          className="flex-1 resize-none bg-transparent outline-none"
          placeholder="Type your message here..."
          value={inputText}
          onChange={e => setInputText(e.target.value)}
          onKeyDown={e => {
            if (e.key === 'Enter' && !e.shiftKey) {
              e.preventDefault()
              handleSend()
            }
          }}
        />
        <button
          onClick={handleSend}
          disabled={processing || loading}
          className=" text-teal-500 outline-none underline underline-offset-4 disabled:cursor-not-allowed"
        >
          Send
        </button>
      </div>
    </div>
  )
}

export default App
Before, App.jsx only rendered a static chat UI with a stub response. Now it calls the preload API to load the model, stream tokens into the UI, and send messages through completion(). After this change, the chat UI becomes fully wired to QVAC inference.
Task completed
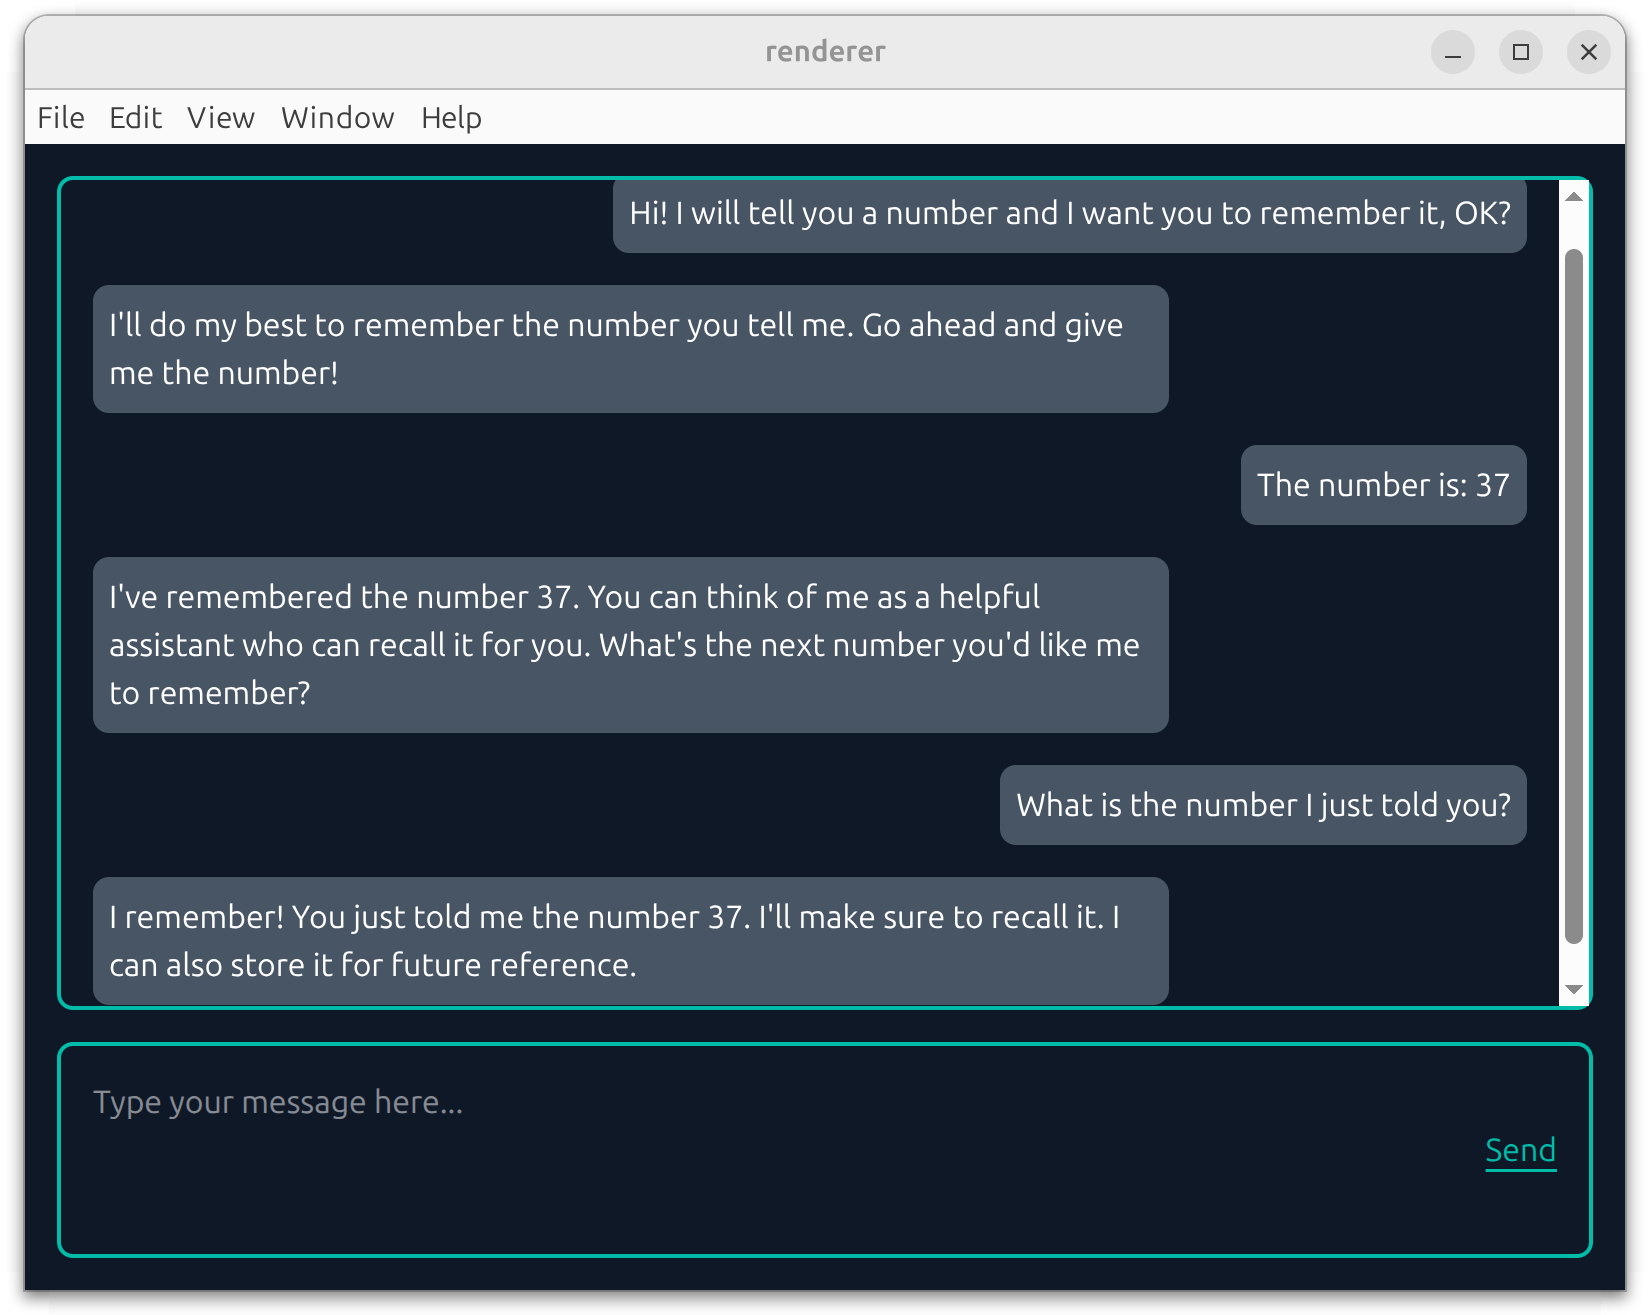
Run the app from the project root:
npm run devOn the first run, the model may download from peers (watch the terminal for progress). Once it finishes, type a message and press Enter or click Send — the response should stream into the UI token by token: